Version 2.5 | Last Updated: August 2026
2026 Routing Guide
Contents
1. Shipment Preparation Rules
Once product-level packaging is complete, prepare the shipment in a way that allows SoldThrough to receive, count and store inventory efficiently.
Step 1.1 - Determine whether palletization is required
A shipment must be palletized if total weight exceeds 250 lbs (113 kg) or if the shipment contains more than 12 individual cartons.
If either threshold is met, use pallets.
If below both thresholds, shipment may be sent as individual cartons if otherwise compliant.
Pallet weigh limit is 2000 lbs. (907 kg).
Step 1.2 - Keep styles and SKUs organized
Styles should not be mixed unnecessarily across multiple cartons. Individual SKUs should not appear in multiple cartons unless SKU quantities exceed carton capacity.
Keep carton contents logical and easy to count.
Avoid spreading the same SKU across many cartons.
Step 1.3 - Observe the maximum units per PO
A maximum of 3,000 units is permitted per PO to support same-day receiving and closure.
Split larger shipments only with prior alignment.
Separate replenishment and newness POs.
Step 1.4 - Observe carton weight limits
Each carton must not exceed 50 lbs (22 kg).
Weigh cartons before sealing final shipment.
Repack overweight cartons before dispatch.
Step 1.5 - Attach packing list documentation
A packing list must be included with each carton or pallet according to the shipment type.
For non-palletized shipments, attach a packing list to each individual carton.
For palletized shipments, attach a packing list to each pallet.


2. Carton Packing Procedure
Step 2.1 - Gather required packing materials
Before packing begins, confirm that all required materials are available.
Boxes/cartons.
Packing tape.
Pallets if the shipment is palletized.
Corner protectors.
Clear shrink wrap.
Packing lists.
Cardboard sheets for top and bottom protection.
Step 2.2 - Prepare the carton base
Place a piece of cardboard at the bottom of the carton to protect merchandise during transit and prevent from potential cutting when opening cartons.
Use clean undamaged cartons.
Do not use weak or previously crushed boxes.
Step 2.3 - Fill the carton carefully
Place merchandise inside the carton and build upwards until the carton is full or close to the weight limit.
Do not exceed 50 lbs / 22 kg.
Do not overstuff the carton.
Keep products organized by SKU and style wherever possible.
Step 2.4 - Add top protection
Place a piece of cardboard on top of the merchandise before sealing.
This helps protect garments if the carton is opened with a blade.
It also helps preserve product presentation.
Step 2.5 - Seal and reinforce the carton
Seal the carton properly, including seams and edges.
Tape all seams.
Reinforce carton edges.
Secure the bottom of the carton.
Step 2.6 - Label the carton
Every carton must be labeled clearly and consistently.
Brand name.
PO number.
Carton number.
Total carton count, such as Carton 3 of 12.
Delivery Address.
Step 2.7 - Attach packing list content
Attach the relevant packing list according to the shipment format.
Palletized shipment: attach packing list to each pallet.
Non-palletized shipment: attach packing list to each individual box.
3. Palletizing Procedure
Step 3.1 - Build a stable pallet
Distribute weight evenly across the pallet. The pallet must be sturdy and safe to move.
Do not allow cartons to lean.
Do not stack heavy cartons on top of fragile cartons.
Do not allow cartons to overhang the pallet.
Step 3.2 - Confirm pallet height/weight
The pallet must not exceed 72 inches / 180 cm in height.
Measure final pallet height after stacking.
Include pallet base in total height where applicable.
Pallet weight limit is 2000 lbs. (907 kg).
Step 3.3 - Add corner protectors
Attach corner protectors to each corner of the pallet.
Use protectors to prevent carton damage during handling.
Ensure protectors remain in place before shrink wrapping.
Step 3.4 - Apply clear shrink wrap
Use clear shrink wrap to secure the pallet. Clear wrap is required so cartons and labels remain visible.
Wrap tightly enough to prevent movement.
Do not cover labels in a way that makes them unreadable.
Step 3.5 - Label the pallet
Attach shipping labels and packing list to the pallet.
Brand name.
PO number.
Pallet or carton count.
Delivery address.
Packing list / box content information.
Non-Palletized Individual Cartons
|
4. Shipment Readiness and Inbound Delivery
Step 4.1 - Confirm the shipment is ready
Before dispatch, confirm that product preparation, carton labels, pallet labels, packing lists and ASN documentation are complete.
Do not ship if packaging approval is still pending.
Do not ship if you have not sent a completed PO form.
Do not ship if ASN has not been submitted.
Step 4.2 - Submit ASN five days before arrival
Send the ASN at least five days prior to shipment arrival.
Include brand name, PO number, total cartons, carrier, tracking number and expected arrival.
Step 4.3 - Schedule delivery one week in advance
Coordinate the delivery at least one week in advance with SoldThrough Operations, at inbound@soldthrough.com
Unscheduled deliveries may be delayed or rejected.
Step 4.4 - Follow all fulfillment center reminders
Ensure duties are paid, routing guide requirements are followed and SoldThrough is not listed as consignee/buyer unless approved.
Follow retailer-specific routing requirements.
Confirm any exceptions in writing before shipping.
Step 4.5 - Monitor shipment tracking
After dispatch, monitor tracking and notify SoldThrough if the ETA changes.
Provide updated tracking information immediately.
Keep the onboarding and shipping teams informed.
5. Chargeback & Prevention
To support a smooth receiving process, SoldThrough warehouse teams inspect shipments when they arrive. If any discrepancies are found, clients may be notified, and retailer chargebacks or non-compliance fees may apply. Ensuring all approvals, labeling, packing, and documentation requirements are completed before shipment is the most effective way to help avoid these charges.
Common Chargeback Triggers
|

Shipping
Key SoldThrough Information
Vendors must not list SoldThrough as the consignee or buyer on the bill of landing.
All deliveries must be scheduled with inbound@soldthrough.com at least one week before arrival.
PO to be submitted at least 2 weeks before shipment.
ASN to be submitted at least 5 days before shipment.
Warehouse opening hours are Monday to Saturday, 8:00am to 3:00pm CST.
Before shipping, contact your Client Success Manager to confirm the correct warehouse address and receiving instructions for your brand.
Use the required shipment naming convention [Brand Name] SoldThrough ATX, 3800 Drossett Drive, Unit F, Austin, Texas
78744--- OR--- [Brand Name] SoldThrough ATX Fulfillment, 3731 Drossett Drive, Austin, Texas.
Do not ship anything to SoldThrough before confirming which address should be used.
Do not send unscheduled deliveries.
Confirm arrival date and warehouse receiving availability.
1. Overview of the Shipping & Logistics Process
This Shipping & Logistics process is designed to ensure that every Brand shipment arrives at SoldThrough prepared, labeled, documented and packaged correctly. Following this process, helps the warehouse receive inventory quickly, reduces manual intervention and protects the client from avoidable chargebacks or non-compliance fees.
The process has nine stages:
|
2. Product Packaging Requirements
Before any shipment is prepared, all merchandise must meet SoldThrough product packaging standards. These requirements help ensure that products can be scanned into inventory without opening each package and without additional relabeling work.
Step 2.1 - Pack every item individually
Each merchandise unit must be packed in its own clear polybag. The bag must be transparent so the product, swing ticket and barcode can be reviewed without opening the packaging. The bag should be sealed securely and should protect the item during handling and transit.
Use one clear polybag per unit.
Do not combine multiple units in one polybag unless explicitly approved.
Ensure the product remains presentable inside the bag.
Step 2.2 - Place the Barcode sticker (UPC/EAN) sticker on the outside of the bag (Every barcode sticker must include the EAN/UPC number, US size, product name and color. Pricing must not appear on the label)
Each polybag must have a Barcode sticker (UPC/EAN) placed on the outside. This is required so the warehouse team can scan the product during receiving more efficiently.
The Barcode must be clean, flat and scannable.
The Barcode number (UPC/EAN) must be printed alongside the barcode.
The Barcode must match the product inside the bag.
Step 2.3 - Ensure the product has an attached Swing ticket
Every item must also have a swing ticket with barcode sticker (UPC/EAN) attached to the product. The Tag should be visible through the polybag so it can be checked during receiving.
Attach the swing ticket securely so it does not detach during shipping.
Ensure the visible UPC/EAN sticker matches the external polybag barcode.
Step 2.4 - Remove retail pricing
Retail pricing is not permitted on swing tickets, barcode labels or packaging. Any retail price shown will create marketplace, receiving or compliance issues.
Do not print retail prices on product tags.
Do not include MSRP stickers unless specifically approved.
Covering pricing is not preferred; provide new labels.
Step 2.5 - Confirm US sizing
Sizes must be listed on garments and Barcode sticker (UPC/EAN) sticker in US sizing. International sizing alone is not sufficient for the SoldThrough receiving process.
US size labels must be clearly shown.
Garment labels and Barcode sticker (UPC/EAN) sticker must match.
Any size conversion should be completed before shipment.
Step 2.6 - Avoid hangers unless approved
Hanger usage is not permitted unless SoldThrough Client Success has pre-approved it. Unapproved hangers may create receiving, storage or fulfillment issues.
Request approval before shipping hanging goods.
Default to folded, polybagged product unless instructed otherwise.
Approval Requirement
|
3. Purchase Order (PO) & Advance Shipment Notice (ASN) Process
Purchase Order Requirements
The Purchase Order process is designed to ensure inventory arrives at the warehouse ready for receiving, counting, and inventory allocation.
Step 3.1 - Submit PO two weeks before shipment
Submit all POs at least 2 weeks before the scheduled shipping date.
Late submissions may delay receiving.
Step 3.2 - Separate Newness and Replenishment POs
Create separate POs for New Styles and Replenishment Styles.
Do not pack replenishment and newness SKUs together.
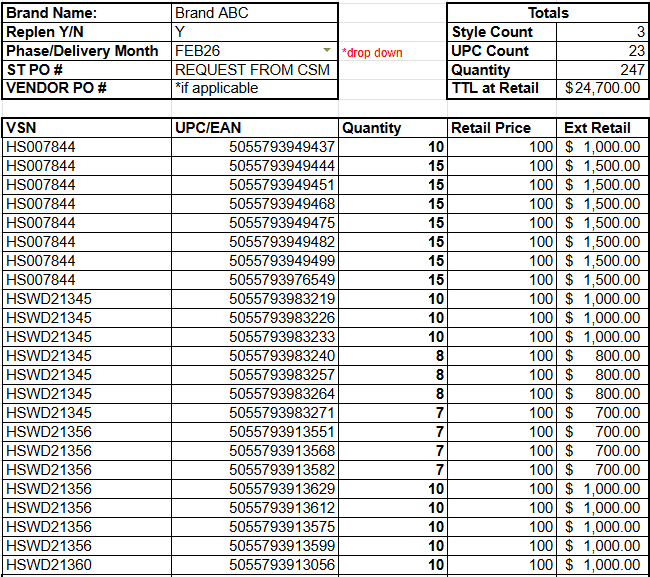
Step 3.3 - Include required PO information
VSN Style Number.
UPC Numbers.
Wholesale Price.
Units by UPC.
Reference Example – PO Form:
Step 3.4 - Observe PO quantity limits
Maximum 3,000 units per PO.
Split larger shipments into multiple POs.
Step 3.5 – Shipping and Delivery Box Requirements
One UPC per carton.
Mixed UPC cartons are not permitted.
Packing slip must match ASN.
Include with every shipment.
PO Number.
Carton Number.
Total Carton Count.
Pack according to product hierarchy.
Required over 250 lbs or more than 12 cartons.
Advance Shipment Notice (ASN) Requirements
The ASN is the formal notification that inventory is being shipped to SoldThrough. It allows the warehouse and onboarding teams to prepare for the delivery, validate the expected inventory and schedule receiving resources.
Step 3.6 - Complete the ASN before shipping
The client must complete the ASN before the goods are shipped. The ASN should be accurate and match the physical shipment.
Do not ship without preparing the ASN.
Do not submit partial or estimated carton details unless agreed in advance.
Step 3.7 - Submit the ASN at least five days before arrival
The ASN must be sent at least five days before the shipment arrives at the SoldThrough facility. This lead time helps the warehouse plan receiving and avoid delays.
Submit earlier where possible for larger shipments.
Update SoldThrough immediately if tracking or arrival date changes.
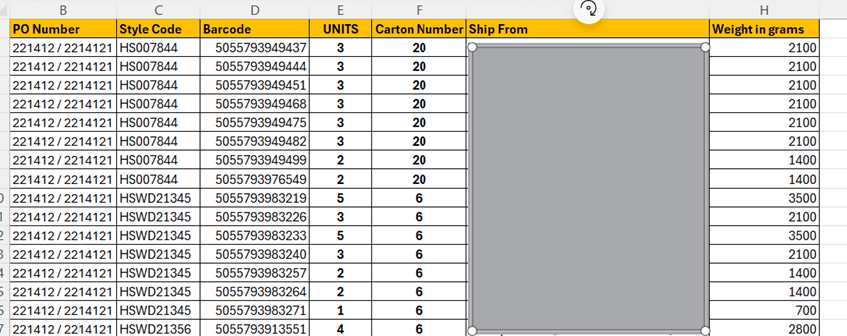
Step 3.8 - Include all required ASN information
The ASN must include all shipment-level and carton-level information needed for receiving.
PO number provided by the Client Success team.
Total carton count and carton numbers.
Detailed packing list with UPCs/EANs.
Units shipped.
Carrier details.
Tracking information.
Expected arrival date.
Step 3.9 - Email the completed ASN to the correct teams
Once completed, the ASN must be emailed to both onboarding and shipping contacts so all relevant SoldThrough teams are informed.
Send to onboarding@soldthrough.com.
Send to inbound@soldthrough.com.
Keep your Client Success Manager copied on future shipments, when assigned.
ASN Best Practice
|
4. Order Processing and Shipping Standards
After inventory has been received and made available, SoldThrough follows standard marketplace order processing and shipping practices. These expectations help brands understand customer fulfillment timelines.
Outbound Order Standards
|
5. Detailed Step-by-Step Product and Shipment Preparation
This section converts the presentation workflow into a practical step-by-step process that brand teams can follow while preparing inventory for shipment.
Step 5.1 - Check US size labeling
Regardless of product origin, every garment must have a US size label stitched to the garment. This label should be clear and consistent with the size shown on the swing ticket and barcode information.
Confirm size conversion has been completed.
Reject or relabel any item missing a US size label before packing.
Step 5.2 - Attach the swing ticket
Each garment must have a swing ticket securely attached. The swing ticket should include Barcode sticker (UPC/EAN) it is required for receiving.
Check that the swing ticket is not loose and secured.
Ensure the swing ticket remains visible through the polybag.
Step 5.3 - Verify barcode content
Every barcode sticker must include the EAN/UPC number, US size, product name and color. Pricing must not appear on the label.
Scan a sample barcode before shipment.
Verify the barcode matches the product inside the bag.
Remove any label that includes retail price.
Step 5.4 - Verify the care label
Each care label must clearly reflect US FTC requirements, including care instructions, fabric composition and country of origin.
Check care label exists before packing.
Do not ship garments with missing or incomplete care labels.
Step 5.5 - Pack the item in a clear polybag
Once labels and tags are confirmed, place the garment in a transparent clear polybag that meets standard packaging requirements.
Ensure the bag is transparent.
Seal the polybag securely.
Keep the garment neat and presentable.
6. Packing the Garments
Step 6.1 - Place the garment neatly inside the polybag
Fold the garment so it looks presentable and fits properly inside the bag. The item should not appear crushed, wrinkled or overpacked.
Fold consistently across the shipment.
Avoid forcing oversized products into small bags.
Step 6.2 - Position the swing ticket facing up
The swing ticket must face upward and be clearly visible through the bag. This allows warehouse staff to verify product information quickly.
Do not hide the tag under folds.
Do not allow the swing ticket to face inward or become unreadable.
Step 6.3 - Apply the second external barcode sticker
Place an additional EAN/UPC barcode sticker on the outside of each bag. This label allows faster identification and scanning during receiving.
Apply label flat and wrinkle-free.
Keep it away from bag seams where scanning may be difficult.
Step 6.4 - Provide examples before shipping
Provide SoldThrough with examples of the swing ticket, Barcode sticker (UPC/EAN) and packaging presentation.
Photos are acceptable.
Videos may be used if they show how items are packed.
Do not proceed until packaging is approved.
Step 6.5 - Complete a final garment-level check
Before boxing, review each packed item to confirm that all required labels are present and visible.
Check visibility through the polybag.
Confirm barcode and product details match.
Set aside any non-compliant items for correction.
7. Anti-Dumping and Compliance
Step 7.1 - Declare anti-dumping exposure where required
The Continuous Bond paperwork includes declarations regarding anti-dumping duties, imported commodity categories and future compliance obligations.
Anti-dumping duties.
Imported commodity categories.
Future compliance obligations.
8. General Shipping and Customs Guidance (HTSUS, Tariff Codes, MID Code, CAIN Setup)
Step 8.1 - Confirm import duty expectations
Import duty generally applies to all goods entering the United States. Apparel duties typically range from approximately 10% to 28%, depending on garment composition and classification. Cotton garments are usually at the higher end.
Step 8.2 - Confirm the HTSUS number
The HTSUS number, or Harmonized Tariff Schedule of the United States, is the U.S. version of the international HS code system. The first 6 digits are universal internationally, the final digits are country-specific and in the U.S the full tariff classification is called the HTSUS number.
The first 6 digits are universal internationally.
The final digits are country-specific.
In the U.S , the full tariff classification is called the HTSUS number.
Step 8.3 - Identify the correct tariff code
Tariff codes can be identified using U.S Customs and Border Protection resources, the HTSUS tariff website, and guidance from the freight forwarder or customs broker. If the brand does not already have HS/HTS codes, they can be built using product classification pathway tools.
Links To The HS/HTS/Tariff Code Identifiers:
United States | |
United Kingdom | |
Australia |
Step 8.4 - Prove shipment value
In most cases, U.S Customs requires the declared value to reflect the transaction value and the actual price paid or payable between buyer and seller. Factory invoices are usually acceptable supporting documentation.
Step 8.5 - Confirm MID code requirements
MID stands for Manufacturer Identification Code. It is used instead of the full manufacturer address, required for many formal U.S. customs entries and included on commercial invoices and customs paperwork. The MID code is used by U.S Customs and Border Protection (CBP), FDA and USDA.
Used instead of the full manufacturer address.
Required for many formal U.S. customs entries.
Included on commercial invoices and customs paperwork.
Used by CBP, FDA and USDA.
Step 8.6 - Confirm CAIN setup timing
The CAIN number setup process generally only takes a few hours, depending on how quickly the importer completes the required documentation.
9. U.S. Apparel Labeling Requirements
Step 9.1 - Confirm required apparel label information
U.S. apparel labels generally require fiber content, country of origin, manufacturer or RN number, care instructions and permanent label placement.
Fiber content.
Country of origin.
Manufacturer or RN number.
Care instructions.
Permanent label placement.
Step 9.2 - Display fiber content correctly
Fiber content must use FTC-approved fiber names, be listed in descending percentage order and total 100%.
Use FTC-approved fiber names.
List fibers in descending percentage order.
Ensure percentages total 100%.
Example: 95% Cotton / 5% Elastane.
Step 9.3 - Display country of origin clearly
Country of origin must be clearly visible. Examples include Made in China, Made in USA or Assembled in Mexico. For neck garments, the origin label should appear at the inside center neck.
Step 9.4 - Include mandatory care labels
U.S. FTC Care Label Rules require permanent labels, durable and legible instructions and at least one safe care method. Instructions should include washing, bleaching, drying, ironing and dry cleaning if applicable.
Washing.
Bleaching.
Drying.
Ironing.
Dry cleaning, if applicable.
Step 9.5 - Follow U.S - specific care symbol requirements
The U.S uses different care symbol standards from Europe/Ginetex requirements. U.S - specific care label guidance should be followed.
Link To The U.S Government Web site: https://www.ftc.gov/business-guidance/resources/clothes-captioning-complying-care-labeling-rule?
Reference Example - USA vs EU vs Australia Garment Labeling Differences
10. Children’s Apparel Requirements
Step 10.1 - Confirm whether children’s apparel rules apply
Children’s apparel may require CPSIA tracking labels, manufacturer and batch/date information and flammability compliance testing.
CPSIA tracking labels.
Manufacturer and batch/date information.
Flammability compliance testing.
Step 10.2 - Review children’s sleepwear rules
Children’s sleepwear, robes and pajamas must comply with 16 CFR Parts 1615/1616.
11. Product Compliance and Restricted Goods
Step 11.1 - Review restricted goods and sourcing risk
U.S Customs may reject products suspected of being manufactured using forced labor, including goods linked to Xinjiang Province, China, under UFLPA regulations.
Review product origin and sourcing regions.
Confirm products are not linked to forced labor risk.
Confirm documentation is available if customs requests support.
Step 11.2 - Complete final garment compliance checks before shipping
Before shipping to the USA, brands should confirm that labels are accurate and spell-checked, care instructions are tested, labels survive laundering, no misleading claims appear and flammability standards are reviewed where applicable.
Labels are accurate and spell-checked.
Care instructions are tested.
Labels survive laundering.
No misleading claims appear.
Flammability standards are reviewed where applicable.
…
8. General Shipping and Customs Guidance (HTSUS, Tariff Codes, MID Code, CAIN Setup)
Step 8.1 - Confirm import duty expectations
Import duty generally applies to all goods entering the United States. Apparel duties typically range from approximately 10% to 28%, depending on garment composition and classification. Cotton garments are usually at the higher end.
Step 8.2 - Confirm the HTSUS number
The HTSUS number, or Harmonized Tariff Schedule of the United States, is the U.S. version of the international HS code system. The first 6 digits are universal internationally, the final digits are country-specific and in the U.S the full tariff classification is called the HTSUS number.
The first 6 digits are universal internationally.
The final digits are country-specific.
In the U.S , the full tariff classification is called the HTSUS number.
Step 8.3 - Identify the correct tariff code
Tariff codes can be identified using U.S Customs and Border Protection resources, the HTSUS tariff website, and guidance from the freight forwarder or customs broker. If the brand does not already have HS/HTS codes, they can be built using product classification pathway tools.
Links To The HS/HTS/Tariff Code Identifiers:
United States | |
United Kingdom | |
Australia |
Step 8.4 - Prove shipment value
In most cases, U.S Customs requires the declared value to reflect the transaction value and the actual price paid or payable between buyer and seller. Factory invoices are usually acceptable supporting documentation.
Step 8.5 - Confirm MID code requirements
MID stands for Manufacturer Identification Code. It is used instead of the full manufacturer address, required for many formal U.S. customs entries and included on commercial invoices and customs paperwork. The MID code is used by U.S Customs and Border Protection (CBP), FDA and USDA.
Used instead of the full manufacturer address.
Required for many formal U.S. customs entries.
Included on commercial invoices and customs paperwork.
Used by CBP, FDA and USDA.
Step 8.6 - Confirm CAIN setup timing
The CAIN number setup process generally only takes a few hours, depending on how quickly the importer completes the required documentation.
9. U.S. Apparel Labeling Requirements
Step 9.1 - Confirm required apparel label information
U.S. apparel labels generally require fiber content, country of origin, manufacturer or RN number, care instructions and permanent label placement.
Fiber content.
Country of origin.
Manufacturer or RN number.
Care instructions.
Permanent label placement.
Step 9.2 - Display fiber content correctly
Fiber content must use FTC-approved fiber names, be listed in descending percentage order and total 100%.
Use FTC-approved fiber names.
List fibers in descending percentage order.
Ensure percentages total 100%.
Example: 95% Cotton / 5% Elastane.
Step 9.3 - Display country of origin clearly
Country of origin must be clearly visible. Examples include Made in China, Made in USA or Assembled in Mexico. For neck garments, the origin label should appear at the inside center neck.
Step 9.4 - Include mandatory care labels
U.S. FTC Care Label Rules require permanent labels, durable and legible instructions and at least one safe care method. Instructions should include washing, bleaching, drying, ironing and dry cleaning if applicable.
Washing.
Bleaching.
Drying.
Ironing.
Dry cleaning, if applicable.
Step 9.5 - Follow U.S - specific care symbol requirements
The U.S uses different care symbol standards from Europe/Ginetex requirements. U.S - specific care label guidance should be followed.
Link To The U.S Government Web site: https://www.ftc.gov/business-guidance/resources/clothes-captioning-complying-care-labeling-rule?
Reference Example - USA vs EU vs Australia Garment Labeling Differences
10. Children’s Apparel Requirements
Step 10.1 - Confirm whether children’s apparel rules apply
Children’s apparel may require CPSIA tracking labels, manufacturer and batch/date information and flammability compliance testing.
CPSIA tracking labels.
Manufacturer and batch/date information.
Flammability compliance testing.
Step 10.2 - Review children’s sleepwear rules
Children’s sleepwear, robes and pajamas must comply with 16 CFR Parts 1615/1616.
11. Product Compliance and Restricted Goods
Step 11.1 - Review restricted goods and sourcing risk
U.S Customs may reject products suspected of being manufactured using forced labor, including goods linked to Xinjiang Province, China, under UFLPA regulations.
Review product origin and sourcing regions.
Confirm products are not linked to forced labor risk.
Confirm documentation is available if customs requests support.
Step 11.2 - Complete final garment compliance checks before shipping
Before shipping to the USA, brands should confirm that labels are accurate and spell-checked, care instructions are tested, labels survive laundering, no misleading claims appear and flammability standards are reviewed where applicable.
Labels are accurate and spell-checked.
Care instructions are tested.
Labels survive laundering.
No misleading claims appear.
Flammability standards are reviewed where applicable.

📌 Chargebacks will be issued to cover the costs of additional labor, rework, and operational disruptions caused by vendor non-compliance. All chargebacks will be billed in the next billing period. Repeated violations may result in a vendor review, shipping restrictions, or suspension. The team at SoldThrough will do all possible to avoid extra fees—please reach out to your Account Manager with any questions.
Disputing a Chargeback
If you believe a chargeback is invalid, you have 15 days to notify SoldThrough of your dispute with supporting documentation. If a dispute is not submitted within the 15-day period, the charge will remain valid. Disputes must include supporting documentation. SoldThrough will review any timely dispute in good faith, but SoldThrough's reasonable determination as to the validity of a chargeback is final.
1. Shipment Preparation Rules
Once product-level packaging is complete, prepare the shipment in a way that allows SoldThrough to receive, count and store inventory efficiently.
Step 1.1 - Determine whether palletization is required
A shipment must be palletized if total weight exceeds 250 lbs (113 kg) or if the shipment contains more than 12 individual cartons.
If either threshold is met, use pallets.
If below both thresholds, shipment may be sent as individual cartons if otherwise compliant.
Pallet weigh limit is 2000 lbs. (907 kg).
Step 1.2 - Keep styles and SKUs organized
Styles should not be mixed unnecessarily across multiple cartons. Individual SKUs should not appear in multiple cartons unless SKU quantities exceed carton capacity.
Keep carton contents logical and easy to count.
Avoid spreading the same SKU across many cartons.
Step 1.3 - Observe the maximum units per PO
A maximum of 3,000 units is permitted per PO to support same-day receiving and closure.
Split larger shipments only with prior alignment.
Separate replenishment and newness POs.
Step 1.4 - Observe carton weight limits
Each carton must not exceed 50 lbs (22 kg).
Weigh cartons before sealing final shipment.
Repack overweight cartons before dispatch.
Step 1.5 - Attach packing list documentation
A packing list must be included with each carton or pallet according to the shipment type.
For non-palletized shipments, attach a packing list to each individual carton.
For palletized shipments, attach a packing list to each pallet.
2. Carton Packing Procedure
Step 2.1 - Gather required packing materials
Before packing begins, confirm that all required materials are available.
Boxes/cartons.
Packing tape.
Pallets if the shipment is palletized.
Corner protectors.
Clear shrink wrap.
Packing lists.
Cardboard sheets for top and bottom protection.
Step 2.2 - Prepare the carton base
Place a piece of cardboard at the bottom of the carton to protect merchandise during transit and prevent from potential cutting when opening cartons.
Use clean undamaged cartons.
Do not use weak or previously crushed boxes.
Step 2.3 - Fill the carton carefully
Place merchandise inside the carton and build upwards until the carton is full or close to the weight limit.
Do not exceed 50 lbs / 22 kg.
Do not overstuff the carton.
Keep products organized by SKU and style wherever possible.
Step 2.4 - Add top protection
Place a piece of cardboard on top of the merchandise before sealing.
This helps protect garments if the carton is opened with a blade.
It also helps preserve product presentation.
Step 2.5 - Seal and reinforce the carton
Seal the carton properly, including seams and edges.
Tape all seams.
Reinforce carton edges.
Secure the bottom of the carton.
Step 2.6 - Label the carton
Every carton must be labeled clearly and consistently.
Brand name.
PO number.
Carton number.
Total carton count, such as Carton 3 of 12.
Delivery Address.
Step 2.7 - Attach packing list content
Attach the relevant packing list according to the shipment format.
Palletized shipment: attach packing list to each pallet.
Non-palletized shipment: attach packing list to each individual box.
3. Palletizing Procedure
Step 3.1 - Build a stable pallet
Distribute weight evenly across the pallet. The pallet must be sturdy and safe to move.
Do not allow cartons to lean.
Do not stack heavy cartons on top of fragile cartons.
Do not allow cartons to overhang the pallet.
Step 3.2 - Confirm pallet height/weight
The pallet must not exceed 72 inches / 180 cm in height.
Measure final pallet height after stacking.
Include pallet base in total height where applicable.
Pallet weight limit is 2000 lbs. (907 kg).
Step 3.3 - Add corner protectors
Attach corner protectors to each corner of the pallet.
Use protectors to prevent carton damage during handling.
Ensure protectors remain in place before shrink wrapping.
Step 3.4 - Apply clear shrink wrap
Use clear shrink wrap to secure the pallet. Clear wrap is required so cartons and labels remain visible.
Wrap tightly enough to prevent movement.
Do not cover labels in a way that makes them unreadable.
Step 3.5 - Label the pallet
Attach shipping labels and packing list to the pallet.
Brand name.
PO number.
Pallet or carton count.
Delivery address.
Packing list / box content information.
Non-Palletized Individual Cartons
|
4. Shipment Readiness and Inbound Delivery
Step 4.1 - Confirm the shipment is ready
Before dispatch, confirm that product preparation, carton labels, pallet labels, packing lists and ASN documentation are complete.
Do not ship if packaging approval is still pending.
Do not ship if you have not sent a completed PO form.
Do not ship if ASN has not been submitted.
Step 4.2 - Submit ASN five days before arrival
Send the ASN at least five days prior to shipment arrival.
Include brand name, PO number, total cartons, carrier, tracking number and expected arrival.
Step 4.3 - Schedule delivery one week in advance
Coordinate the delivery at least one week in advance with SoldThrough Operations, at inbound@soldthrough.com
Unscheduled deliveries may be delayed or rejected.
Step 4.4 - Follow all fulfillment center reminders
Ensure duties are paid, routing guide requirements are followed and SoldThrough is not listed as consignee/buyer unless approved.
Follow retailer-specific routing requirements.
Confirm any exceptions in writing before shipping.
Step 4.5 - Monitor shipment tracking
After dispatch, monitor tracking and notify SoldThrough if the ETA changes.
Provide updated tracking information immediately.
Keep the onboarding and shipping teams informed.
5. Chargeback & Prevention
To support a smooth receiving process, SoldThrough warehouse teams inspect shipments when they arrive. If any discrepancies are found, clients may be notified, and retailer chargebacks or non-compliance fees may apply. Ensuring all approvals, labeling, packing, and documentation requirements are completed before shipment is the most effective way to help avoid these charges.
Common Chargeback Triggers
|
Shipping
Key SoldThrough Information
Vendors must not list SoldThrough as the consignee or buyer on the bill of landing.
All deliveries must be scheduled with inbound@soldthrough.com at least one week before arrival.
PO to be submitted at least 2 weeks before shipment.
ASN to be submitted at least 5 days before shipment.
Warehouse opening hours are Monday to Saturday, 8:00am to 3:00pm CST.
Before shipping, contact your Client Success Manager to confirm the correct warehouse address and receiving instructions for your brand.
Use the required shipment naming convention [Brand Name] SoldThrough ATX, 3800 Drossett Drive, Unit F, Austin, Texas
78744--- OR--- [Brand Name] SoldThrough ATX Fulfillment, 3731 Drossett Drive, Austin, Texas.
Do not ship anything to SoldThrough before confirming which address should be used.
Do not send unscheduled deliveries.
Confirm arrival date and warehouse receiving availability.
1. Overview of the Shipping & Logistics Process
This Shipping & Logistics process is designed to ensure that every Brand shipment arrives at SoldThrough prepared, labeled, documented and packaged correctly. Following this process, helps the warehouse receive inventory quickly, reduces manual intervention and protects the client from avoidable chargebacks or non-compliance fees.
The process has nine stages:
|
2. Product Packaging Requirements
Before any shipment is prepared, all merchandise must meet SoldThrough product packaging standards. These requirements help ensure that products can be scanned into inventory without opening each package and without additional relabeling work.
Step 2.1 - Pack every item individually
Each merchandise unit must be packed in its own clear polybag. The bag must be transparent so the product, swing ticket and barcode can be reviewed without opening the packaging. The bag should be sealed securely and should protect the item during handling and transit.
Use one clear polybag per unit.
Do not combine multiple units in one polybag unless explicitly approved.
Ensure the product remains presentable inside the bag.
Step 2.2 - Place the Barcode sticker (UPC/EAN) sticker on the outside of the bag (Every barcode sticker must include the EAN/UPC number, US size, product name and color. Pricing must not appear on the label)
Each polybag must have a Barcode sticker (UPC/EAN) placed on the outside. This is required so the warehouse team can scan the product during receiving more efficiently.
The Barcode must be clean, flat and scannable.
The Barcode number (UPC/EAN) must be printed alongside the barcode.
The Barcode must match the product inside the bag.
Step 2.3 - Ensure the product has an attached Swing ticket
Every item must also have a swing ticket with barcode sticker (UPC/EAN) attached to the product. The Tag should be visible through the polybag so it can be checked during receiving.
Attach the swing ticket securely so it does not detach during shipping.
Ensure the visible UPC/EAN sticker matches the external polybag barcode.
Step 2.4 - Remove retail pricing
Retail pricing is not permitted on swing tickets, barcode labels or packaging. Any retail price shown will create marketplace, receiving or compliance issues.
Do not print retail prices on product tags.
Do not include MSRP stickers unless specifically approved.
Covering pricing is not preferred; provide new labels.
Step 2.5 - Confirm US sizing
Sizes must be listed on garments and Barcode sticker (UPC/EAN) sticker in US sizing. International sizing alone is not sufficient for the SoldThrough receiving process.
US size labels must be clearly shown.
Garment labels and Barcode sticker (UPC/EAN) sticker must match.
Any size conversion should be completed before shipment.
Step 2.6 - Avoid hangers unless approved
Hanger usage is not permitted unless SoldThrough Client Success has pre-approved it. Unapproved hangers may create receiving, storage or fulfillment issues.
Request approval before shipping hanging goods.
Default to folded, polybagged product unless instructed otherwise.
Approval Requirement
|
3. Purchase Order (PO) & Advance Shipment Notice (ASN) Process
Purchase Order Requirements
The Purchase Order process is designed to ensure inventory arrives at the warehouse ready for receiving, counting, and inventory allocation.
Step 3.1 - Submit PO two weeks before shipment
Submit all POs at least 2 weeks before the scheduled shipping date.
Late submissions may delay receiving.
Step 3.2 - Separate Newness and Replenishment POs
Create separate POs for New Styles and Replenishment Styles.
Do not pack replenishment and newness SKUs together.
Step 3.3 - Include required PO information
VSN Style Number.
UPC Numbers.
Wholesale Price.
Units by UPC.
Reference Example – PO Form:
Step 3.4 - Observe PO quantity limits
Maximum 3,000 units per PO.
Split larger shipments into multiple POs.
Step 3.5 – Shipping and Delivery Box Requirements
One UPC per carton.
Mixed UPC cartons are not permitted.
Packing slip must match ASN.
Include with every shipment.
PO Number.
Carton Number.
Total Carton Count.
Pack according to product hierarchy.
Required over 250 lbs or more than 12 cartons.
Advance Shipment Notice (ASN) Requirements
The ASN is the formal notification that inventory is being shipped to SoldThrough. It allows the warehouse and onboarding teams to prepare for the delivery, validate the expected inventory and schedule receiving resources.
Step 3.6 - Complete the ASN before shipping
The client must complete the ASN before the goods are shipped. The ASN should be accurate and match the physical shipment.
Do not ship without preparing the ASN.
Do not submit partial or estimated carton details unless agreed in advance.
Step 3.7 - Submit the ASN at least five days before arrival
The ASN must be sent at least five days before the shipment arrives at the SoldThrough facility. This lead time helps the warehouse plan receiving and avoid delays.
Submit earlier where possible for larger shipments.
Update SoldThrough immediately if tracking or arrival date changes.
Step 3.8 - Include all required ASN information
The ASN must include all shipment-level and carton-level information needed for receiving.
PO number provided by the Client Success team.
Total carton count and carton numbers.
Detailed packing list with UPCs/EANs.
Units shipped.
Carrier details.
Tracking information.
Expected arrival date.
Step 3.9 - Email the completed ASN to the correct teams
Once completed, the ASN must be emailed to both onboarding and shipping contacts so all relevant SoldThrough teams are informed.
Send to onboarding@soldthrough.com.
Send to inbound@soldthrough.com.
Keep your Client Success Manager copied on future shipments, when assigned.
ASN Best Practice
|
4. Order Processing and Shipping Standards
After inventory has been received and made available, SoldThrough follows standard marketplace order processing and shipping practices. These expectations help brands understand customer fulfillment timelines.
Outbound Order Standards
|
5. Detailed Step-by-Step Product and Shipment Preparation
This section converts the presentation workflow into a practical step-by-step process that brand teams can follow while preparing inventory for shipment.
Step 5.1 - Check US size labeling
Regardless of product origin, every garment must have a US size label stitched to the garment. This label should be clear and consistent with the size shown on the swing ticket and barcode information.
Confirm size conversion has been completed.
Reject or relabel any item missing a US size label before packing.
Step 5.2 - Attach the swing ticket
Each garment must have a swing ticket securely attached. The swing ticket should include Barcode sticker (UPC/EAN) it is required for receiving.
Check that the swing ticket is not loose and secured.
Ensure the swing ticket remains visible through the polybag.
Step 5.3 - Verify barcode content
Every barcode sticker must include the EAN/UPC number, US size, product name and color. Pricing must not appear on the label.
Scan a sample barcode before shipment.
Verify the barcode matches the product inside the bag.
Remove any label that includes retail price.
Step 5.4 - Verify the care label
Each care label must clearly reflect US FTC requirements, including care instructions, fabric composition and country of origin.
Check care label exists before packing.
Do not ship garments with missing or incomplete care labels.
Step 5.5 - Pack the item in a clear polybag
Once labels and tags are confirmed, place the garment in a transparent clear polybag that meets standard packaging requirements.
Ensure the bag is transparent.
Seal the polybag securely.
Keep the garment neat and presentable.
6. Packing the Garments
Step 6.1 - Place the garment neatly inside the polybag
Fold the garment so it looks presentable and fits properly inside the bag. The item should not appear crushed, wrinkled or overpacked.
Fold consistently across the shipment.
Avoid forcing oversized products into small bags.
Step 6.2 - Position the swing ticket facing up
The swing ticket must face upward and be clearly visible through the bag. This allows warehouse staff to verify product information quickly.
Do not hide the tag under folds.
Do not allow the swing ticket to face inward or become unreadable.
Step 6.3 - Apply the second external barcode sticker
Place an additional EAN/UPC barcode sticker on the outside of each bag. This label allows faster identification and scanning during receiving.
Apply label flat and wrinkle-free.
Keep it away from bag seams where scanning may be difficult.
Step 6.4 - Provide examples before shipping
Provide SoldThrough with examples of the swing ticket, Barcode sticker (UPC/EAN) and packaging presentation.
Photos are acceptable.
Videos may be used if they show how items are packed.
Do not proceed until packaging is approved.
Step 6.5 - Complete a final garment-level check
Before boxing, review each packed item to confirm that all required labels are present and visible.
Check visibility through the polybag.
Confirm barcode and product details match.
Set aside any non-compliant items for correction.
7. Anti-Dumping and Compliance
Step 7.1 - Declare anti-dumping exposure where required
The Continuous Bond paperwork includes declarations regarding anti-dumping duties, imported commodity categories and future compliance obligations.
Anti-dumping duties.
Imported commodity categories.
Future compliance obligations.
8. General Shipping and Customs Guidance (HTSUS, Tariff Codes, MID Code, CAIN Setup)
Step 8.1 - Confirm import duty expectations
Import duty generally applies to all goods entering the United States. Apparel duties typically range from approximately 10% to 28%, depending on garment composition and classification. Cotton garments are usually at the higher end.
Step 8.2 - Confirm the HTSUS number
The HTSUS number, or Harmonized Tariff Schedule of the United States, is the U.S. version of the international HS code system. The first 6 digits are universal internationally, the final digits are country-specific and in the U.S the full tariff classification is called the HTSUS number.
The first 6 digits are universal internationally.
The final digits are country-specific.
In the U.S , the full tariff classification is called the HTSUS number.
Step 8.3 - Identify the correct tariff code
Tariff codes can be identified using U.S Customs and Border Protection resources, the HTSUS tariff website, and guidance from the freight forwarder or customs broker. If the brand does not already have HS/HTS codes, they can be built using product classification pathway tools.
Links To The HS/HTS/Tariff Code Identifiers:
United States | |
United Kingdom | |
Australia |
Step 8.4 - Prove shipment value
In most cases, U.S Customs requires the declared value to reflect the transaction value and the actual price paid or payable between buyer and seller. Factory invoices are usually acceptable supporting documentation.
Step 8.5 - Confirm MID code requirements
MID stands for Manufacturer Identification Code. It is used instead of the full manufacturer address, required for many formal U.S. customs entries and included on commercial invoices and customs paperwork. The MID code is used by U.S Customs and Border Protection (CBP), FDA and USDA.
Used instead of the full manufacturer address.
Required for many formal U.S. customs entries.
Included on commercial invoices and customs paperwork.
Used by CBP, FDA and USDA.
Step 8.6 - Confirm CAIN setup timing
The CAIN number setup process generally only takes a few hours, depending on how quickly the importer completes the required documentation.
9. U.S. Apparel Labeling Requirements
Step 9.1 - Confirm required apparel label information
U.S. apparel labels generally require fiber content, country of origin, manufacturer or RN number, care instructions and permanent label placement.
Fiber content.
Country of origin.
Manufacturer or RN number.
Care instructions.
Permanent label placement.
Step 9.2 - Display fiber content correctly
Fiber content must use FTC-approved fiber names, be listed in descending percentage order and total 100%.
Use FTC-approved fiber names.
List fibers in descending percentage order.
Ensure percentages total 100%.
Example: 95% Cotton / 5% Elastane.
Step 9.3 - Display country of origin clearly
Country of origin must be clearly visible. Examples include Made in China, Made in USA or Assembled in Mexico. For neck garments, the origin label should appear at the inside center neck.
Step 9.4 - Include mandatory care labels
U.S. FTC Care Label Rules require permanent labels, durable and legible instructions and at least one safe care method. Instructions should include washing, bleaching, drying, ironing and dry cleaning if applicable.
Washing.
Bleaching.
Drying.
Ironing.
Dry cleaning, if applicable.
Step 9.5 - Follow U.S - specific care symbol requirements
The U.S uses different care symbol standards from Europe/Ginetex requirements. U.S - specific care label guidance should be followed.
Link To The U.S Government Web site: https://www.ftc.gov/business-guidance/resources/clothes-captioning-complying-care-labeling-rule?
Reference Example - USA vs EU vs Australia Garment Labeling Differences
10. Children’s Apparel Requirements
Step 10.1 - Confirm whether children’s apparel rules apply
Children’s apparel may require CPSIA tracking labels, manufacturer and batch/date information and flammability compliance testing.
CPSIA tracking labels.
Manufacturer and batch/date information.
Flammability compliance testing.
Step 10.2 - Review children’s sleepwear rules
Children’s sleepwear, robes and pajamas must comply with 16 CFR Parts 1615/1616.
11. Product Compliance and Restricted Goods
Step 11.1 - Review restricted goods and sourcing risk
U.S Customs may reject products suspected of being manufactured using forced labor, including goods linked to Xinjiang Province, China, under UFLPA regulations.
Review product origin and sourcing regions.
Confirm products are not linked to forced labor risk.
Confirm documentation is available if customs requests support.
Step 11.2 - Complete final garment compliance checks before shipping
Before shipping to the USA, brands should confirm that labels are accurate and spell-checked, care instructions are tested, labels survive laundering, no misleading claims appear and flammability standards are reviewed where applicable.
Labels are accurate and spell-checked.
Care instructions are tested.
Labels survive laundering.
No misleading claims appear.
Flammability standards are reviewed where applicable.
…
8. General Shipping and Customs Guidance (HTSUS, Tariff Codes, MID Code, CAIN Setup)
Step 8.1 - Confirm import duty expectations
Import duty generally applies to all goods entering the United States. Apparel duties typically range from approximately 10% to 28%, depending on garment composition and classification. Cotton garments are usually at the higher end.
Step 8.2 - Confirm the HTSUS number
The HTSUS number, or Harmonized Tariff Schedule of the United States, is the U.S. version of the international HS code system. The first 6 digits are universal internationally, the final digits are country-specific and in the U.S the full tariff classification is called the HTSUS number.
The first 6 digits are universal internationally.
The final digits are country-specific.
In the U.S , the full tariff classification is called the HTSUS number.
Step 8.3 - Identify the correct tariff code
Tariff codes can be identified using U.S Customs and Border Protection resources, the HTSUS tariff website, and guidance from the freight forwarder or customs broker. If the brand does not already have HS/HTS codes, they can be built using product classification pathway tools.
Links To The HS/HTS/Tariff Code Identifiers:
United States | |
United Kingdom | |
Australia |
Step 8.4 - Prove shipment value
In most cases, U.S Customs requires the declared value to reflect the transaction value and the actual price paid or payable between buyer and seller. Factory invoices are usually acceptable supporting documentation.
Step 8.5 - Confirm MID code requirements
MID stands for Manufacturer Identification Code. It is used instead of the full manufacturer address, required for many formal U.S. customs entries and included on commercial invoices and customs paperwork. The MID code is used by U.S Customs and Border Protection (CBP), FDA and USDA.
Used instead of the full manufacturer address.
Required for many formal U.S. customs entries.
Included on commercial invoices and customs paperwork.
Used by CBP, FDA and USDA.
Step 8.6 - Confirm CAIN setup timing
The CAIN number setup process generally only takes a few hours, depending on how quickly the importer completes the required documentation.
9. U.S. Apparel Labeling Requirements
Step 9.1 - Confirm required apparel label information
U.S. apparel labels generally require fiber content, country of origin, manufacturer or RN number, care instructions and permanent label placement.
Fiber content.
Country of origin.
Manufacturer or RN number.
Care instructions.
Permanent label placement.
Step 9.2 - Display fiber content correctly
Fiber content must use FTC-approved fiber names, be listed in descending percentage order and total 100%.
Use FTC-approved fiber names.
List fibers in descending percentage order.
Ensure percentages total 100%.
Example: 95% Cotton / 5% Elastane.
Step 9.3 - Display country of origin clearly
Country of origin must be clearly visible. Examples include Made in China, Made in USA or Assembled in Mexico. For neck garments, the origin label should appear at the inside center neck.
Step 9.4 - Include mandatory care labels
U.S. FTC Care Label Rules require permanent labels, durable and legible instructions and at least one safe care method. Instructions should include washing, bleaching, drying, ironing and dry cleaning if applicable.
Washing.
Bleaching.
Drying.
Ironing.
Dry cleaning, if applicable.
Step 9.5 - Follow U.S - specific care symbol requirements
The U.S uses different care symbol standards from Europe/Ginetex requirements. U.S - specific care label guidance should be followed.
Link To The U.S Government Web site: https://www.ftc.gov/business-guidance/resources/clothes-captioning-complying-care-labeling-rule?
Reference Example - USA vs EU vs Australia Garment Labeling Differences
10. Children’s Apparel Requirements
Step 10.1 - Confirm whether children’s apparel rules apply
Children’s apparel may require CPSIA tracking labels, manufacturer and batch/date information and flammability compliance testing.
CPSIA tracking labels.
Manufacturer and batch/date information.
Flammability compliance testing.
Step 10.2 - Review children’s sleepwear rules
Children’s sleepwear, robes and pajamas must comply with 16 CFR Parts 1615/1616.
11. Product Compliance and Restricted Goods
Step 11.1 - Review restricted goods and sourcing risk
U.S Customs may reject products suspected of being manufactured using forced labor, including goods linked to Xinjiang Province, China, under UFLPA regulations.
Review product origin and sourcing regions.
Confirm products are not linked to forced labor risk.
Confirm documentation is available if customs requests support.
Step 11.2 - Complete final garment compliance checks before shipping
Before shipping to the USA, brands should confirm that labels are accurate and spell-checked, care instructions are tested, labels survive laundering, no misleading claims appear and flammability standards are reviewed where applicable.
Labels are accurate and spell-checked.
Care instructions are tested.
Labels survive laundering.
No misleading claims appear.
Flammability standards are reviewed where applicable.
📌 Chargebacks will be issued to cover the costs of additional labor, rework, and operational disruptions caused by vendor non-compliance. All chargebacks will be billed in the next billing period. Repeated violations may result in a vendor review, shipping restrictions, or suspension. The team at SoldThrough will do all possible to avoid extra fees—please reach out to your Account Manager with any questions.
Disputing a Chargeback
If you believe a chargeback is invalid, you have 15 days to notify SoldThrough of your dispute with supporting documentation. If a dispute is not submitted within the 15-day period, the charge will remain valid. Disputes must include supporting documentation. SoldThrough will review any timely dispute in good faith, but SoldThrough's reasonable determination as to the validity of a chargeback is final.
Want to scale with SoldThrough? Speak to us today
Book a free call
Want to scale with SoldThrough?
Speak to us today
Book a free call
Want to scale with SoldThrough?
Speak to us today
Book a free call
Want to scale with SoldThrough? Speak to us today
Book a free call